
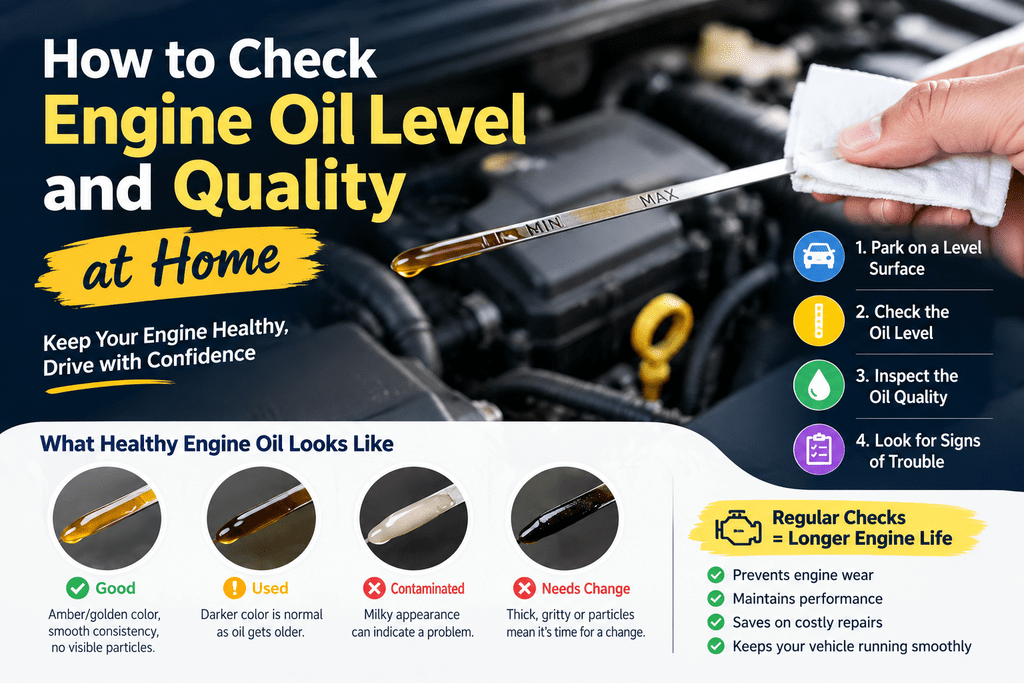
Regularly checking your engine oil is one of the easiest ways to keep your bike’s engine running smoothly. The right bike engine oil lubricates moving parts, reduces friction, helps manage engine temperature, and protects internal components from excessive wear.
The good news is that you don’t always need a mechanic to check engine oil level and quality. With a few simple steps, you can check your bike engine oil at home and identify common signs that it may need a top-up or replacement.
In this guide, we’ll explain how to check engine oil level and quality at home, what healthy motorcycle oil should look like, when to check it, and the warning signs you shouldn’t ignore.
Table of Contents
- Why Is Checking Bike Engine Oil Important?
- When Should You Check Engine Oil?
- What You Need Before Checking Engine Oil
- How to Check Engine Oil Level at Home
- How to Check Bike Engine Oil Quality
- What Does Healthy Engine Oil Look Like?
- Signs Your Bike Engine Oil Needs Changing
- Common Mistakes to Avoid
- How Often Should You Check Bike Engine Oil?
- Frequently Asked Questions
Engine oil plays a vital role in protecting your motorcycle engine. It lubricates components such as pistons, bearings, camshafts, gears, and other moving parts.
Using the correct engine oil for bike applications is important because motorcycle engines can have different lubrication requirements depending on the engine design and manufacturer’s specifications.
Over time, bike engine oil can become contaminated, lose some of its protective properties, or fall below the recommended level. Riding with low or degraded oil can increase friction and engine wear.
A regular engine oil level and quality check can help you:
- Prevent excessive engine wear
- Maintain smooth bike engine performance
- Reduce friction between moving components
- Detect possible oil leaks
- Avoid expensive engine repairs
- Maintain proper lubrication
- Support smooth gear shifting
- Maintain overall engine reliability
The best time to check engine oil is when your bike is parked on a level surface and the engine has been switched off for enough time for the oil to settle.
For many motorcycles, the correct oil-checking procedure can vary. Some bikes use a dipstick, while others have an oil-level inspection window.
Always follow the procedure specified in your owner’s manual.
You should also check your bike engine oil before a long ride and whenever you notice unusual engine noise, rough performance, difficult gear shifting, or an oil warning light.
You don’t need special equipment for a basic engine oil inspection. You will generally need:
- A clean, lint-free cloth or paper towel
- Your motorcycle owner’s manual
- A level parking surface
- A few minutes of time
Make sure the bike is safely parked and the engine is switched off before beginning the inspection.
The method for checking motorcycle engine oil level depends on your bike. Many motorcycles use an oil-level window, while some use a dipstick.
Step 1: Park the Bike on a Level Surface
Park your motorcycle on a flat and level surface. An uneven surface can cause the oil reading to be inaccurate.
Keep the motorcycle in the position recommended by the manufacturer when checking the oil level.
Step 2: Locate the Oil Level Indicator
Depending on your motorcycle, you may find an oil-level inspection window or a dipstick.
If your bike has a dipstick, locate it near the engine oil filler area. If it has an inspection window, look for the MIN and MAX or lower and upper level markings.
Step 3: Check the Oil Level Correctly
If your bike uses a dipstick, remove it and wipe it clean with a lint-free cloth. Reinsert it according to the manufacturer’s instructions and remove it again to check the oil level.
If your motorcycle uses an inspection window, keep the bike in the correct position and check whether the oil level falls within the marked range.
Step 4: Check the Oil Level
The oil level should normally be within the recommended range.
- Below MIN: The engine may need an oil top-up.
- Between MIN and MAX: The level is generally within the marked range.
- Above MAX: There may be too much oil, which can also cause problems.
Never overfill the engine. Use the correct engine oil for bike specified by the manufacturer and add oil gradually if a top-up is required.
Checking oil level is only part of motorcycle maintenance. You can also inspect your bike engine oil for its appearance and consistency.
1. Check the Oil Color
Fresh engine oil is often amber or golden, depending on the oil type. As it is used, it normally becomes darker because it collects contaminants and combustion by-products.
Dark oil does not automatically mean it is bad. Oil color should be considered along with its age, mileage, condition, and the manufacturer’s recommended service interval.
2. Check the Oil Consistency
Healthy motorcycle engine oil should generally have a smooth, oily consistency.
If the oil appears unusually thick, heavily contaminated, or contains visible particles, it may require further inspection.
3. Look for Contamination
Pay attention to unusual deposits or particles in the oil.
If you notice a milky or creamy appearance, especially around the oil filler area or in the oil itself, it can indicate contamination and should be professionally inspected.
4. Smell the Oil Carefully
A strong burnt smell can be a warning sign that the oil has been exposed to excessive heat or may need attention.
If the oil smells unusually burnt, consider having the bike inspected.
There is no single color that defines healthy bike engine oil because oil appearance changes depending on the oil type, engine, mileage, and operating conditions.
Generally, motorcycle oil should:
- Have a smooth oily texture
- Be free from obvious metal particles
- Not appear unusually milky
- Not contain excessive sludge
- Be within the recommended service interval
- Be at the correct level
Remember that oil color alone is not a reliable way to determine whether engine oil needs changing.
Apart from checking the oil level, watch for signs that your bike engine oil may need attention.
Common warning signs include:
- Oil level repeatedly dropping
- Unusual engine noise
- Rough engine performance
- Excessive engine vibration
- Burning oil smell
- Visible oil leaks
- Oil warning light
- Difficult or rough gear shifting
- Excessive exhaust smoke
- Reduced engine performance
If the oil level keeps falling between checks, don’t simply keep topping it up. Have the motorcycle checked for leaks or possible oil consumption.
When checking bike engine oil at home, avoid these common mistakes:
Checking on an Incline
Always try to check the oil on a level surface. Parking on a slope can produce an inaccurate reading.
Checking Only Once
If your motorcycle uses a dipstick, clean it, follow the manufacturer’s procedure, and check the level again.
Overfilling the Engine
Adding too much engine oil can be harmful. Add oil gradually and recheck the level rather than adding a large amount at once.
Using the Wrong Oil
Always use the best engine oil for your bike based on the viscosity, specification, and oil type recommended by the motorcycle manufacturer.
Don’t select bike oil based only on brand or price. The correct specification is more important.
Judging Oil Only by Color
Dark oil isn’t necessarily bad, and clean-looking oil isn’t necessarily good. Consider the oil’s age, mileage, specification, and overall condition.
A good habit is to check your bike engine oil regularly, especially before long journeys.
The exact inspection and oil-change interval depends on your motorcycle, engine, oil specification, riding conditions, and manufacturer’s recommendations.
If you frequently ride in heavy traffic, make short trips, ride in high temperatures, carry heavy loads, or use your motorcycle extensively, paying closer attention to engine oil condition can be beneficial.
Always follow the maintenance schedule provided in your owner’s manual.
The best engine oil for a bike is the oil that meets the viscosity and performance specifications recommended by the motorcycle manufacturer. Always check your owner’s manual before choosing bike engine oil.
Park the bike on a level surface and follow the manufacturer’s recommended procedure. Depending on the motorcycle, you may check the oil using a dipstick or an oil-level inspection window.
Look for unusual contamination, a milky appearance, excessive particles, sludge, or a strong burnt smell. Also consider the oil’s mileage, age, and recommended replacement interval.
Do not assume that car engine oil is suitable for a motorcycle. Many motorcycles, particularly those with wet clutches, require oil meeting specific motorcycle standards. Always use the oil specification recommended for your bike.
Knowing how to check engine oil level and quality at home can help you identify potential problems before they become expensive repairs. A quick inspection of your bike engine oil takes only a few minutes but can provide valuable information about your motorcycle’s lubrication system.
Use the correct engine oil for bike applications based on your manufacturer’s specifications, check the oil level regularly, and follow the recommended oil-change schedule.
Regular checks combined with timely bike engine oil changes are among the simplest ways to help keep your motorcycle engine performing reliably for years to come.